Thursday, March 31, 2011
No Foolin'! Our Monthly *NEW & IMPROVED* Blog Party runs April 1-7
Friday, March 25, 2011
Friday Fun Day Challenge -- Inside-out paper and a photo collage
FRIDAY FUN DAY CHALLENGE
Where imitation is the highest form of flattery!
Hi everyone! Natalie here again...
It's Friday, and you know what that means-- Lucky Girls Friday Fun Day!
Aren't the colors in the March kit rich and sumptuous? They inspired me to make a layout using photos I had just taken (believe me, I have never scrapbooked anything this quickly after the fact!). I took these photos on a Thursday night and started working on my project the next evening!

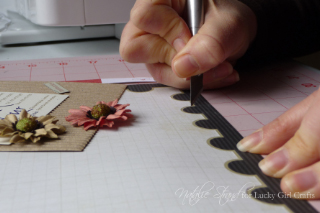
First, let's talk about the way I used the paper from the March kit. I loved the Stamp of Approval patterned paper, but I felt like my photos looked funny on the otherwise wonderful creamy grid. By chance, the paper got flipped over while I was working, and I saw my photos with that wonderful red tone-on-tone B-side. The color accentuated the dim,warm light in the photos from the restaurant, but I still loved that border, so I decided to take a risk and cut out the center of the paper and flip it so that the red was framed by the black stamp edge...

I think it came out pretty well!
I also want to talk about the collage photo.
I had a lot of photos from our date night at a French restaurant. It was our first time eating "real" French cuisine, and I was excited about all the wonderful dishes we had. When I started making my layout, I decided the best way to include all my photos was to make a collage.
Now, you can have collage photos printed through a lot of online photo printing places, and their software makes arranging the photos really easy. But I wanted a little more control (and the instant gratification of having the print in my hands within minutes of finishing it, haha)!
Want to make your own collage layout, too? I used Photoshop Elements for mine, and here's a quickie tutorial...I'm not an expert, but these 6 steps worked for me:
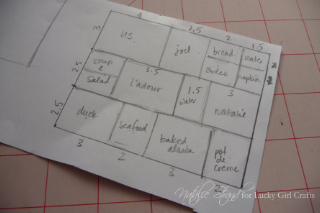
1. I sketched my collage layout on a piece of scrap paper (yes, nerd that I am, it is to scale! 1 cm = 1") to plan where each photo would go.

2. I opened all my photos in Photoshop Elements Editor (I made sure to adjust the color, etc. on each one individually).
3. I created a new canvas of the size I wanted (in this case, 8"x10"), specifying a resolution of 300 pixels/inch.
4. I cropped each photo to the size I wanted (using my diagram), again specifying a resolution of 300 pixels/inch.
5. I dragged and dropped into position each cropped photo onto the large canvas, and used Edit>Stroke (Outline) Selection... for each photo layer to create a black border.
6. I saved the finished canvas as a .jpg and printed it with my photo printer!
I think the longest part of the whole process was deciding how to arrange my photos!
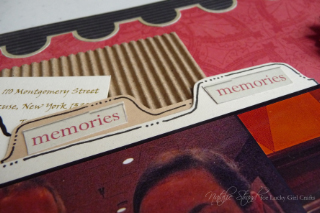
I added some journaling (including our selections from the menu!) on cards tucked into a pocket behind the photo...

...and embellished with those fabulous Prima Damsels, a strip from the Borders patterned paper, and a few bits of Ephemera.

I hope this project inspires you to use your Lucky Girl kit in a new way! I can't wait to see what you create. Be sure to link up your projects to this post for your chance to win!
Lucky Girl Supplies:
patterned paper: Echo Park "For the Record" (Stamp of Approval, Borders)
embellishments: Prima Damsels, K & Co. ephemera, corrugated cardboard
other supplies:
scrap cardstock for journaling pull-outs
foam adhesive
black pen
Thanks for playing along with the March Friday Fun Day Challenge! Link your projects here:
Wednesday, March 23, 2011
Mid-Week Mojo -- Ephemera Shadowbox
Happy Wednesday! It's Natalie here with your weekly dose of Mid-Week Mojo!
One of my favorite ways to spice up a scrapbook page is by making clusters of embellishments. When I opened the March kit, I was thrilled to see the K. & Co. Ephemera die cuts. I thought to myself, what better way to show off an embellishment cluster than to make it the main event!

For my background, I was inspired by the doilies on the patterned papers in the kit. So I pulled out an old paper doily I had stashed away and used it as a mask as I sprayed the pewter mist from the kit.

By opening the mist bottle, I used the end of the sprayer to add a few blotches for extra interest...
I chose my favorite die cuts and arranged them, using pop dots to add dimension.

I added a paper ruffle and that fabulous pompom trim (::love!::) to balance the off-center cluster.

Finally, I framed the cluster in a shadow box frame!
I hope you've been inspired to make some embellishment clusters of your own!
Lucky Girl supples:
K & Co. Ephemera die cuts
Bazzill pompom trim
Tsukineko Sheer Shimmer Spritz (Pewter)
patterned paper scraps: Echo Park "For the Record" (Apron Strings, Borders)
Other supplies:
paper doily for masking
shadowbox frame
foam adhesive
cardstock for background
Saturday, March 19, 2011
Sensational Saturday Scrapping...
Friday, March 18, 2011
Friday Fun Day Challenge - Tussie Mussie Tutorial
FRIDAY FUN DAY CHALLENGE
Where imitation is the highest form of flattery!
Play along for your chance to win the April Lucky Girl Crafts kit or LUCKY BUCKS store credit!!!!
To participate the FFD challenge, you must create your own project inspired by any of the Friday Fun Day projects our Lucky Girls have created this month - Ana's awesome Tissue Tussie, below, Sabrina's Homemade Happiness Baby Album, or Emily's Home Sweet Home decor project. Use their project's...
Overall Design /Layout
Color Combination
Title of the Project
Use of Embellies
...as an inspiration starting point to create your own work of art, then post it here for a chance to WIN!
Wednesday, March 16, 2011
Mid-week Mojo - Sometimes, it's gotta be about you :)
 It's even one of those all-to-rare layouts about me, myself and I. Sometimes, I think, it's very important for us pathological picture takers to turn the camera around and capture ourselves in the moment. Scrapbooking is such a fantastic way to tell our own stories, but sometimes we get so caught up in the piles of pictures devoted to everyone else that we forget how much of an integral part we play in our stories.
Tuesday, March 15, 2011
Spring Cleaning Sale! Only ONE of each bundle is available - get yours now!
HUGE SAVINGS OF 20-30% OFF!
Hurry and get yours now before they're gone, because there is just one of each bundle!
Here's how the sale works:
1) Prices listed are US dollars.
2) $3.50 for the first bundle, $1 each additional bundle. International first class shipping will be based upon the country it's being sent to.
3) The first person to call "dibs" gets the bundle. This means, the first person to e-mail me at jasafras98@yahoo.com OR comment on the Facebook picture(s) with their order gets their requested bundle(s) as long as payment is received in a timely fashion. You will receive a PayPal invoice for the total and you have 3 days to pay. If payment has not been received after 3 days, you forfeit your bundle(s) and they go back up for sale.
(P.S. You don't need a PayPal account to purchase as there is an option to pay the invoice by credit card.)
4) To be fair to other buyers, please no "take backs".
5) As bundles are called for, I will update this post to list them as "pending sale". Feel free to e-mail me if you are interested still, however. If they don't sell to the first person who calls them, I'll notify you.
 Flower Soft Inspiration Pack – regularly $16.97 // NOW JUST $13.58
Flower Soft Glue, Flower Soft Spring Mix; Flower Soft Wires (10 ct.), Flower Soft Recipes for Happy Families (papercraft CD-rom with Card Topper & Paper Tole designs, Backing Papers & more), plus a tip sheet for using Flower Soft
 Sweet Winter Memories Inspiration Pack – regularly $16.95 // NOW JUST $11.86
American Crafts Dear Lizzy Details “Tidings” layered felt stickers, American Crafts Dear Lizzy Delights “Winter Blooms”, American Crafts Dear Lizzy Mini Marks “Snowy Phrases”, Bo Bunny Trims “Bella Journee”, Prima Say It In Crystals (small clear flourish)
 Spring Romance Inspiration Pack – regularly $14.26 // NOW JUST $10.70
Glitz Design Metallic Rub-Ons “Music”, Petaloo Mulberry Street Mini Magnolias (soft yellow), Pink Paislee Flip Notes “Queen Bee” , Prima Say it in Pearls (butterfly cream)
 Fun & Bright Inspiration Pack – regularly $16.44 // NOW JUST $12.33
American Crafts Dear Lizzy Delights “Winter Blooms”, Cosmo Cricket Cardstock Stickers “Togetherness”, Maya Road Felt Badges “Fruit Basket”, My Mind’s Eye Bohemian Transfer Title “ Delight”, Prima Alphabet Stickers (red epoxy on white fabric), Prima Say It In Pearls (clear crystals & brown pearl flourish)
 Lucky Girl Must-Have bundle - regularly $16.47 // NOW JUST $13.18
Tombow Mono Aqua Liquid Adhesive, Tombow Mono Multi Liquid Adhesive, Westcott Titanium Bonded Ultra Smooth 5" Microtip Scissors
 Little Miss Mini Kit - regularly $14.49 // NOW JUST $10.14
Echo Park Paper Life Is Good "Floral Dress", Echo Park Paper Life is Good " Set the Table", Imaginisce Enchanted "Fairy Trails", AD Glitz Glittered Cardstock "Champagne", SEI Lovebirds "Truffle" Double-dipped Cardstock (dark brown w/ teal on reverse) // ALPHA: SEI Aunt Gertie 12x12 Cardstock Alphabet // EMBELLIES: Jenni Bowlin Green/Pink Dotted Label Stickers, My Mind's Eye Quite Contrary "Mary Mary Happy Birthday" Accessory Sheet, Prima e. Designer Pearls Butterfly; Making Memories Love Adhesive Metal Badge, 2 - Making Memories Findings Flower Stick Pins, 1 yard 1" Chocolate Grosgrain Ribbon w/ White Stitching
 Bold & Beautiful Inspiration Pack – regularly $18.93 // NOW JUST $13.25
 American Crafts Remarks “Igor” Alphas, Bo Bunny Rub Ons “Tweet Tweet”, Bo Bunny “Boo Crew” Blossoms, Glitz Design Metallic Rub-Ons “Music”, Pink Paislee Pixee Stix glitter (plum), Pink Paislee “Bayberry Cottage” Punchouts,Pink Paislee "Bayberry Cottage" Cork Buttons, Prima Say It In Crystals (small clear flourish)
 Holiday Delights Inspiration Pack – regularly $18.95 // NOW JUST $13.26
 American Crafts Dear Lizzy Details “Tidings” layered felt stickers, American Crafts Dear Lizzy Delights “Winter Blooms”, American Crafts Dear Lizzy Mini Marks “Snowy Phrases”, Bo Bunny Trims “Bella Journee”, Clearsnap Designer Foils “Irish Eyes”
 Little Girl Inspiration Pack – regularly $12.47 // NOW JUST $9.38
Imaginisce Die Cuts “ Enchanted Collection”, My Mind’s Eye Bohemian Transfer Titles “All Girl”, My Mind’s Eye So Sophie “I Love You” Journaling Spot; Petaloo FloraDoodles Jeweled Florettes, Prima Say it in Pearls (butterfly cream)
 Blingy Alpha Bundle – regularly $14.97 // NOW JUST $11.23
American Crafts “Bumble” Thickers (puffy black sparkles), American Crafts “Sparkling” Thickers (pine glittered chipboard), American Crafts “Stroll” Thickers (white glittered chipboard)
 ***SALE PENDING***Mommy’s Little Monster Mini Kit – regularly $10.49 // NOW JUST $7.87 ***SALE PENDING***
Bo Bunny Whoo-ligans Monsters, Bo Bunny Whoo-ligans Boo, Bo Bunny Whoo-ligans Stripe, Bo Bunny Whoo-ligans Spooky Die Cut, 3 sheets coordinating Bazzil Cardstock, ALPHA: Prima Alphabets in Charcoal; EMBELLIES: Approximately 20 assorted coordinating Making Memories, Petaloo & Prima flowers, 18” Lime Green Felt Ric-Rac, 18” Multi-Striped Grosgrain, 12” Bazzill Black Pom Pom Trim; Large Embellished Paperclip
 Glitzy Glam Inspiration Pack – regularly $16.45 // NOW JUST $12.34
Glitz Design Metallic Rub-Ons “Music”, Pink Paislee Pixee Stix (gold), Pink Paislee Sweetness Clear Cards, Prima Alphabet Stickers (red epoxy on white fabric), Prima Say It In Crystals (small clear flourish)
Happy Shopping! :)
Friday, March 11, 2011
Friday Fun Day - Beautiful, Homemade Happiness Baby Album
FRIDAY FUN DAY CHALLENGE
Where imitation is the highest form of flattery!
This is your first chance of the month to enter to win the April Lucky Girls kit.*
To participate the FFD challenge, you must create your own project inspired by any of the following from the Friday Fun Day projects posted here on the Lucky Girls blog each week in March:
Color Combination
Title of the Project
Use of Embellies
no later than April 2nd!
Hello fellow Lucky ladies! Sabrina here with you today to share a little inspiration in the form of a mini album I created for my sister - a non-scrapbooker - and her soon-to-be baby boy. I wanted to create something like a brag book that she can carry around with her to show off all those sweet moments of baby's first few weeks but also something that won't require much effort for her to complete. She won't have time with a newborn and because scrapbooking isn't really her thing.
To make the cover I used 2 5x7 pieces cut from the Coordinations cardstock and decorated (everything in this mini came from our March kit, Homemade Happiness) and cut pages from a page protector that has the individual 4x6 pockets to house the inside pages.
The layout is similar on each page - a 4x6 cardstock or patterned paper with a border on the outside of the page. It's pretty simple but when you mix up the papers it adds a lot of extra fun. The first page has a spot for her ultrasound photo (I thought the lantern was appropriate here :)) and on the journaling card she can put her due date.
The next pages are for photos of mom, dad and mom's belly - whatever she wants to include. I glued some of the embellishments to the outside of the plastic so the book will have the layered effect when she inserts a photo in the pocket.
These pages are my favorite from the book! Love this color scheme! Here she can add photos from right after the birth and include height, weight, date, etc on the journaling card.
More photos of baby's first day can go here...
And attached to the back of the bicycle card is a little pocket that can hold baby's hospital bracelet.
Here are a few more pages she can add whatever photos she likes and more journaling cards to jot down notes and thoughts she has about baby.
One final page and a jumbo frame for a photo of the new family :). After I picked out all the pages, embellishments and journaling cards to go with, I bound the book with my often neglected Bind-it-All. Hole punches and rings or ribbon would work just as well.
Just had to use the horse head die-cut somewhere in this book - my sister adores horses! I added an envelope in the back made from the Dotted Swiss cardstock to tuck in extra memorabilia and photos.
On the inside of the back cover, I stapled a length of trim to loop around the brad on the front cover and secure the book closed.
Join us this Saturday, March 12 from 10-11 a.m. MST for our first SPECIAL SATURDAY FACEBOOK-ONLY SALE!
SAVE 20-30% on a limited number of bundles filled with scrappy awesomeness - nothing over $15!
But hurry, the first dibs on each bundle is the LUCKY GIRL who gets the deal!
*************************


